You know what? Underneath that tired, possibly stained, dust mite-infested carpet, there’s very likely a wooden floor that could look a million times better – if you knew how to sand and paint it.
Luckily, I did just that recently, so here are my tips for doing it yourself…
1. Clear the room – Sanding a wooden floor can be dusty, especially if you have gaps between floorboards to fill. Take all your furniture out, cover shelves and mantels with plastic sheeting and take the curtains or blinds down. This will save you hours of time (and heartache) later, and it’s never a bad idea to stick the curtains into the dry cleaners when you’ve got them down.
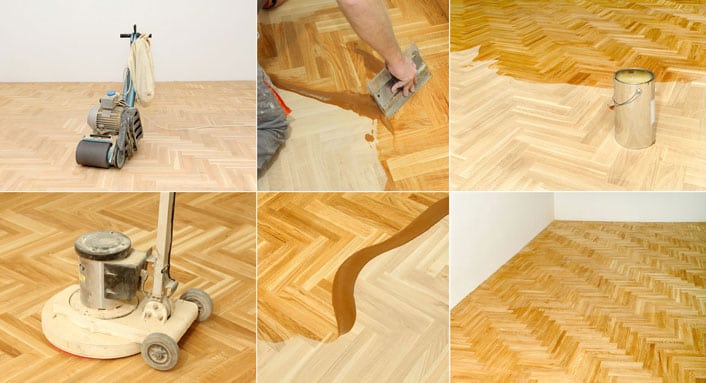
2. Prepare the floor – Your wooden floor may have cuts in it from electrical or plumbing fitting, or from various repairs. You may even need to replace a board or two if they’re badly damaged. Fill any gaps you find with two-part wood filler. If your gaps are wider than 5mm, you may need to roll up some newspaper and press it into the gap to give you something to fill up against. Carefully lift any mouldings you find, which can sometimes sit between floorboards and a skirting board. If you lift these gently, you might be able to salvage them, otherwise most DIY stores have huge moulding selections you can replace them with. If you had carpets down, you’ll need to lift the gripper rods and any staples that held your underlay down. Also, if you’ve taken carpet up, you’ll need to get a different profile of threshold strip for any doorways into the room. If you’re going to paint the floor, fix down any loose, squeaky boards by screwing them down before you start filling. However, if you want to varnish your floor, use brad nails to secure your boards instead, as it’s a better look on wooden boards. It’s very important not to screw or nail down the middle of the end of your floorboard, as this is where the pipes and electrics will run if you have them. This is why floorboards are secured in the corners instead.
3. Get sanding – If your room is small, you have the time – and if your fingers could stand up to the grating they’d get – you could sand your floor by hand. But the best plan is to hire a drum floor sander from any building hire shop. They are a bit heavy, but you can have them delivered with plenty of sandpaper, and they’ll do the job very quickly and easily. Use 40 grit sandpaper to start, if you have old varnish or lots of ground-in debris, then use 120 grit to finish, so the surface ends up smooth. Work methodically up and down the room, making sure you don’t sand in one place for too long – the coarse sandpaper can really eat into the boards. Finish sanding the edges of the floor where the sander can’t quite reach by hand (or you could also borrow an edging sander), and then sweep and vacuum up the dust. And it’s a good idea to shake out your dust sheets now, so no dust falls on your floor while you’re painting.
4. Choose the right paint – You can paint, stain or varnish your sanded floor in a wide range of colours and finishes, but make sure you buy products that are specifically for floors – they are harder wearing and certainly worth the small extra cost per litre. You can use 3″ or 4″ brushes to paint with. If you use a roller, which is quicker, it will leave your floor with a stippled effect, which doesn’t look so good on a painted floor. With a brush, you can lay off your paint work for a smoother finish – this means painting in the direction of the grain of wood, and painting any drips back into the wood. If you are painting your floor, you’ll need to put at least two coats of undercoat down first. Make sure you use a compatible undercoat to the top coat you are using – they are often designed to work together. I used Farrow & Ball paint for my floor, so two coats of wood floor primer and undercoat, followed by two coats of Charleston Gray Modern Eggshell.
5. Don’t paint yourself into a corner – Most importantly, start on the far edge of the room and don’t paint yourself into a corner (this does happen, and is a right laugh when the apprentices do it!). If you intend to keep your doors on their hinges during the job, make sure you paint the floor behind them before you paint yourself out of the room. Also, open the windows so you don’t poison yourself with fumes. Pay attention to the drying times, so you can get multiple coats on efficiently, and paint the top coats in the same way. For stains and varnishes, apply in the same way, just don’t forget that ventilation – they can be really smelly.